|
|
|
Unit Plan / Suggested Time Line
Grade Level: 3rd (may be adapted to other elementary or middle school grade levels)
Day 1 - Introduction
Materials:
Slides
Chinese Artifacts*
* I use many of the items I purchased on a trip to China - slides or posters could be substituted for these items, or many larger cities have Chinatowns where items reflecting Chinese culture can be purchased at a reasonable cost.
In the Art Room:
To introduce the study of Chinese art and
culture, students will view some Chinese artifacts, including a traditional
scroll painting, embroidery, money, seals, and contemporary Chinese art.
I also show some of the slides I took on a study tour of China to give the students some ideas about what the Chinese culture is like. The "Traditions Quest" will give your students some of the same information.
In the Computer Lab:
Materials:
"Traditions and Culture"
Worksheet #1 (Click here to go to Worksheet
#1)
Pencils
Computers with Internet
Access
Have students access the Traditions Quest (from the Webquests Home Page - www.artsinchina.20m.com/Webquest Home.html). The worksheets should be completed with the information discovered in the webquest. If students are not familiar with the internet, take time at the beginning of class to review appropriate internet procedures, how to scroll up and down a web page and how to use the back button on their browser.
As students get a feeling for the Chinese people and how they live, it is a good time to bring up the poverty found in that country (and many other nations). Discuss with students our responsibility to others, how we can help, and introduce the Heifer Project. Refer to the website for details on the different programs available and select the one that would fit best with your students.
Click here to go directly to the Heifer Project website.
Day 2 - In the Computer Lab:
Materials Needed:
"Chinese Painting" Worksheet #2 (Click here
to go to Worksheet #2)
"Seals and Calligraphy" Worksheet #3 (Click
here to go to Worksheet
#3)
We will focus on Chinese painting, especially traditional painting. Students will complete the Chinese Painting Quest and the Seals and Calligraphy Quest. In the Painting Webquest, students will compare several different traditional style paintings and be able to identify the three main components of this style of painting. They will then investigate the seals and some calligraphy in the Seals and Calligraphy Webquest, and complete the assignment by getting their "Chinese Name" from the internet. This name should be printed out and given to the teacher to have for the next art class. If any students are absent, assign another student to do their name for them. If students are not familiar with printing, show them the printer icon.
If you have any scroll paintings (or pictures of them) or seals for the students to look at, bring them to this class and display them. I usually pass the seals around for the students to have a chance to see them up close.
** Note: Some students may take longer to complete the webquests than others. If some are finished early, they may access the following website to "tour" the Great Wall and other Chinese landmarks at the following website: www.walkthewall.com/greatwall.html.
Day 3 - Art Room
Materials:
Foam Shapes (I use the Pen Score
Foam, available in the United Art & Educ. Catalog)
Pencils or wooden picks
Chinese Name Symbols (from the
web site accessed in the Computer Lab on Day 2:
http://www.mandarintools.com/chinesename.html.)
Red Ink Pads
Scrap Paper
Students will use the symbols that they received from the name translator web site to create a stamp of their name in Chinese (to be used as a seal on thier projects). Students may pick one of the name symbols to copy onto the foam, and this will become their Chinese name.
Students should take the printout of their Chinese name, turn it over and trace it onto to back of the page. It may help to use light tables or hold the page up to a window so that they can easily see the image through the paper. This makes the image reversed, so that when they copy it onto the foam it will print out on the paper in the original form.
Have the students practice drawing the reversed symbol onto scrap paper, when they feel confident they can copy it onto the foam, pressing down hard with thier pencils or picks to impress the character into the foam. Symbols can be tested by printing them in red ink on scrap paper to make sure the impressions are deep enough. A "good" impression and the stamp itself should be turned in for their portfolio. The stamp will be used to sign their artwork produced in this unit. Be sure their English names are written on the stamp with a Sharpie!
As students finish their projects in the Art Room, I have them work on a drawing and letter to send to a pen pal in China. Students are to draw a picture of themselves doing one of their favorite activities, or a picture of themselves and their family. On the back of the picture, I have them write a short introductory letter and print their name and address in block lettering for the pen pal to write back. Some students prefer to use the school's address, and that is fine, but be sure to let the school secretary know what to do with these letters from China! I send my student's letters and pictures to teachers that I met on my trip to China, and they distribute them for me, but you can find your own pen pal contacts at www.epals.com.
Day 4 - Art Room
Materials:
Black India Ink
Bamboo Brushes
12 x 18 White Drawing Paper
12 x 18 Newsprint
Water
Paper Towels
Visuals:
Chinese Traditional Scroll Painting
(or a poster of one.)
Students will view a Chinese traditional scroll painting, review the names of the different parts as learned in the Painting Webquest (image, calligraphy, seals), and discuss the painting. Discussion of the painting should be guided by the teacher, using some of the questions below:
Questions for the Chinese painting:
What is the subject of this painting?
Where is the calligraphy?
What do you think it says?
Where are the seal(s)?
How many seals do you see?
What do you think the seals stand for?
What colors are used in the painting?
What material is used to paint on?
What tools do you think were used in making
this painting?
What kinds of line were used?
Do you see any patterns?
Do you see any shapes?
Would you like to hang this painting in
your house? Why? or Why not?
Students then will be introduced to the media of ink and bamboo brush. The teacher can share this with the students as they prepare to use the brushes.
Bamboo Brushes
"Bi" is the Chinese word for brush, it means
"writing instrument". Explain that Chinese boys and girls learn to
use a brush at a very young age because that is how they learn to write
their letters, and so they are much more skilled in brushwork in that country
at a much younger age. Chinese brushes are unique in that the tip
always ends in a fine point, no matter what size the brush is.
The invention of the brush is attributed to Meng Tian in 250 B.C., but they probably existed earlier (as seen on decorations on pottery from the Shang era, c. 1523-1028 B.C.) Many different types of animal hairs have been used for these brushes - weasel, rabbit, deer, sable, fox, etc. The brush tip consists of hair from one or more animals, blended and bound together. The hair is glued to the handle (which is why it is important not to soak your brushes in water - it quickly breaks down the glue.)
The hairs of a new bamboo brush are stiff and need to be put into water until they spread (about a minute or two.)
Holding the brush
Place the brush handle between the middle
and ring fingers, bracing it with the thumb and resting your index finger
against the handle. NEVER grip the brush like a pen or pencil (this
is the hardest part for the students to get used to!) The proper
grip is relaxed, yet firm, and the brush should be held vertically.
Students will practice holding while the teacher checks their technique.
Remind students of the picture on the Calligraphy website about holding
a brush, and demonstrate the proper form for them to imitate.
Brush Positions
There are two basic positions for the brush:
vertical position and slant position. The Vertical position will
have the brush almost perpendicular to the paper (this is also the position
used for calligraphy.) The less pressure on the brush, the finer
the line that will be produced. The brush should be held about in
the middle of the handle.
The Slant Position will position the brush at about a 45 degree angle to the paper, and the brush should be held a little closer to the tip - about 2/3 of the way down the handle. This position allows strokes that are wider and have variations in shading.
The teacher will demonstrate the different
ways to create lines using ink/brush, and then students will have the opportunity
to experiment. The students will be shown both vertical position,
which uses only the tip of the brush; and the slant position, which
uses the whole brush. Take and fold a piece of 12 x 18 white drawing
paper into 8 sections: 8 squares are formed and students can use
the creases as dividing lines. They should try to fill as many squares
as they can with different types of line. Some different types of
lines and techniques to demonstrate to the students should be:
Horizontal lines
Vertical lines
Varying pressure on the point (making the
line go from fat to skinny to fat without lifting the brush)
Wavy lines, straight lines
Curved lines, spirals
Students will also be shown how to use an
ink wash (rinse the brush almost completely and create a grayish tone over
the area.)
Encourage students to use as many practice
sheets of newsprint as they need to get used to the brush. They should
complete the 8 square sheet before the end of class, using the wash technique
as one of the squares. Students who finish early may paint a picture
with the lines they have been practicing.
Day 5 - Art
Room
Materials:
Black India Ink
Bamboo Brushes
Water
Paper Towels
Drawing Paper
8 ½ x 8 ½ pieces of
white copy paper (3 per student)
9 x 9 pieces of colored origami
paper (3 per student)
Gluesticks
Handouts: Chinese Calligraphy - Print some of the Chinese Characters from the Calligraphy and Seals Webquest for the students to look at in class. (This could also be copied onto an overhead transparency.) Click here to go to that Webquest now.
Fun Fact: Did you know that there are over 50,000 known characters in the Chinese language??
Students will be introduced to Chinese calligraphic characters and will have the opportunity to practice making the words they select with ink and bamboo brushes. Students should be reminded how to properly hold the brush, and to vary the pressure on the tip for their lettering. They will then practice their characters on newsprint until they are ready to make their final rendering. Students will paint their characters onto 8 1/2" x 8 1/2" squares of white copy paper. Be sure students write their name lightly in pencil on each square.
After drying, the copy paper with the Chinese lettering will be glued onto squares of colored origami paper with the gluesticks. The lettered paper should be centered on the origami paper. Students will then need to write (in small lettering) the English translation of the Chinese character at the bottom of the page, and should include a brief definition (for example: "Friends" - those people that you can count on to be there when you need them.) These squares will be used in the next lesson to make an Origami book.
Day 6 - Art Room
Materials:
Chinese lettering on paper squares,
backed with colored origami paper (completed in Day 5)
4 ½ x 4 ½ squares
of matboard (2 per student)
Gluesticks
Ribbon (about 24" per student)
Scrap Paper (cut into 8 ½
x 8 ½ squares)
Handouts: Origami book folding -
Click here to access the handout: Origami
Directions
Teacher will pass out the handout and their Chinese lettering pages (completed in Day 5) and demonstrate to the class how to fold their papers. Students will practice on scrap paper. Some students seem to catch on right away, and others struggle. I usually make the ones who find it easy my helpers and that way we can quickly reach every student that needs one-on-one help. After you make a couple, it is very easy! When they are proficient, they can fold their colored squares and assemble them. The parts of the book should be stacked like a sandwich, glued together in the following order:
1. Matboard (Colored side out)
2. 1st Lettered Origami square (folded
up, there is an 'open' end and the opposite end where the center of the
paper is. I tell students that the open end is the 'feet' and the
closed end, or paper center, is the 'head'. This makes it easier
for them to properly stack the layers.)
3. 2nd Lettered Origami square (this square's
'head' should be at the first one's 'feet'.)
4. 3rd Lettered Origami square (this
square's 'head' should be at the second one's 'feet'.)
5. Piece of Ribbon (about 24"
per book)
6. Matboard (colored side out.)
Glue each layer together with a glue stick,
being sure to go all the way to the edges.
When all layers are glued together, the book opens up like an accordian. The ribbon piece is used to tie the book together so it stays folded.
If this sounds confusing, here are some pictures of the completed book:
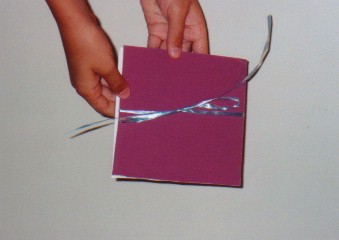 The
book closed and tied shut.
The
book closed and tied shut.
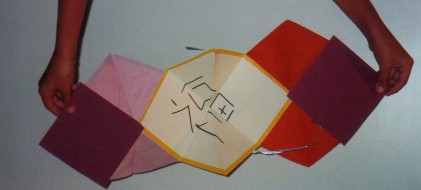 The
book opened up (from the back.)
The
book opened up (from the back.)
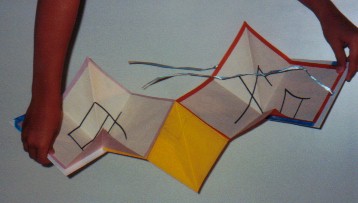 The
book opened up (from the front.)
The
book opened up (from the front.)
You can see how placing the separate pages "head to toe" creates an accordian style book. Give it a try - you will be surprised at how easy this is - my 3rd graders end up making extra "pages" out of scrap paper and making additional books on their own.
Their books should be imprinted with the seal that they carved in Lesson 2.
Day 7 - Art Room
Materials:
Black India Ink
Bamboo Brushes
Water
Paper Towels
Newsprint
The Teacher will demonstrate the methods
for using bamboo brushes to create a Chinese painting landscape.
Click here to see directions for painting bamboo trunks and leaves:
Students will practice the different strokes on newsprint, and will turn in their best copy.
Day 8
Materials:
Black India Ink
Bamboo Brushes
Water
Paper Towels
Sumi-E Kozo Paper (rice paper)
Newsprint
Students will continue to practice the strokes they learned in the previous lesson. When they feel confident, they can create a landscape of bamboo on the Sumi-E Kozo Paper. Follow the directions given in the "Bamboo in the Moonlight" (above). When dry, the painting should be imprinted with the name seal that they carved in Lesson 2, giving consideration to the placement of the seal as an integral part of the pictures design.
The students then write a diamante about their artwork. To get them going, do a few on the board as a class. A diamante is a short poem that has a diamond shape.
Constructing a Diamante:
One word descriptive equivalent
Action phrase
Simile (like a...)
Summation (one word)
Example:
China
Bamboo waving
Like feathers in the wind
Peaceful
Have students look at their bamboo painting for inspiration and encourage them to express the feeling that the painting gives them in their poetry. Finished diamantes can be copied onto small paper and displayed along with the artwork - our english version of the calligraphy in a Chinese painting.
I hope that your students enjoy this unit as much as mine do -- good luck, and if you have any questions or experience any problems, please feel free to contact me at: cbjschmith@aol.com.
To return to the Home Page, click here.